I saw that these little “person” cookies are an Azeroth tradition! But I don’t want little human person cookies, I want draenei cookies. With a few simple changes, you can also make little draenei cookies.
You will need:
1 batch of your favourite cutout cookie recipe (Gingerbread or sugar cookies work well, for this demo I used sugar cookies).
1 “gingerbread man” shaped cookie cutter preferably with rounded feet as shown below.
Other cutters look like this, and because of the shape of their feet/legs they wouldn’t work as well for these cookies. The one on the far left MIGHT work but has a more pronounced heel than I’d prefer. The other ones, no.

Don’t ask me why I have so many little person cutters, or why the last one looks like a chalk line incident.
A bit of flour in a small bowl
Rolling pin
Sharp knife (like a paring knife)
2 parchment paper lined baking sheets
Small spatula for moving cookies
For decorating:
Batch of either buttercream or royal icing
Candies, sprinkles, etc. Specifically for these cookies I used confetti for the eyes/buttons, white sanding sugar for outfit cuffs, and red sanding sugar for the bodies.
Food coloring – if you want really intense colours you will need the paste type colouring such as Wilton makes. I used Cornflower Blue, Red Red, and Black.
Paper plates (if you’re going to use sanding sugar)
The next part of what you’ll need depends on how you intend to decorate. If you are going to use Royal Icing, I highly recommend you use little squeeze bottles (found at Michaels or other craft stores). You’ll also need meringue powder which you can find in a kitchen store or at Michaels, and a little icing spatula for spreading the icing. I’ll have a section specifically about Royal Icing later on.
If you’re just using regular buttercream, you’ll need a piping bag and at least one round tip. You can do the whole “sandwich bag with the tip snipped” trick if you’re in a pinch, but it’s not going to give great results for detailed decorating.
Okay, now comes the fun part! You’ve got your area all ready:
Your baking sheets are also ready to go:
Great! So flour your rolling surface, also flour your rolling pin a little bit, and roll out your dough to 1/4″ thickness. Use your cookie cutter to cut out a little person shape.
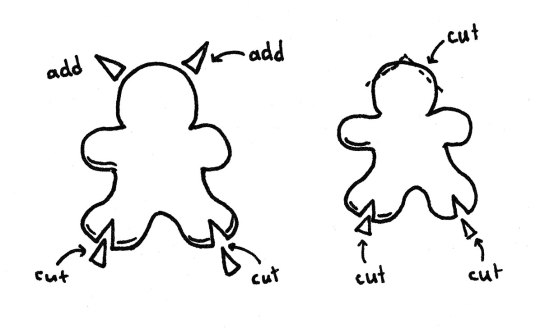
Okay, so you’ve got your little person shape. Ordinarily this is the part where you’d just drop it on the baking sheet, but you’re not going to do that yet. Take your sharp knife that I mentioned before. Now cut a triangle out of the bottom of the cookie’s feet. Like so:
Now you have to make a decision. Are you making a lady or a dude draenei cookie? If you are making a dude, take your sharp knife and cut just a sliver of cookie off the top of his head so that it forms a point! If you are making a lady, move your cookie to the baking sheet for the next step.
Okay, so you’ve got your draenei cookie onto the parchment-lined baking sheet. Don’t worry if it doesn’t look great on the surface (like mine, which had a weird ugly bit. This dough was dryer than other sugar cookies I have made. Icing hides a multitude of sins). If your cookie is a lady, she’s still missing something! You have an option here: 1) Use the triangles you cut from her feet to make the horns, or 2) cut shapes from scraps to make the horns. I’ve done it both ways, and either way is fine. If you cut them, it’ll look like this:
Now attach your horns gently to your draenei’s head by setting them alongside in the appropriate place, and gently smoothing between the two pieces with your fingers. Gently round them if desired, or leave them straight if that’s the style of horn you’d prefer. At this stage your cookie should look like this:

It doesn’t matter if the horns aren’t exactly perfect, as they should smooth out a bit while baking.
Bake your cookies at the temperature and for as long as your recipe directs. Watch them carefully, especially sugar cookies are pretty delicate and the small parts (like horns) will tend to brown very quickly. Here you can see two of my cookies after baking. This was a new recipe for sugar cookies I was trying, and they browned a bit more than I would’ve liked.
Hooray! Your cookies are baked. Let them cool on the baking sheet for awhile. You don’t want them to be at all warm when you go to start decorating. While they’re cooling, you can make your icing and get your decorating stuff ready! Now, you have some choices here as outlined above. I’m going to show you some examples of how I have decorated these cookies before we get into the step-by-step.
These are the gingerbread draenei I made a few years back. I used a plain, white buttercream icing to just draw them on there. You can see this method requires some drawing ability. If you aren’t confident doing that, this might not be the best method for you. BUT, you could use buttercream icing to still make a really nice cookie, just simpler. I’ve never done that personally because I like to make my life complicated, but here’s an example of other, non-draenei cookies I have decorated:
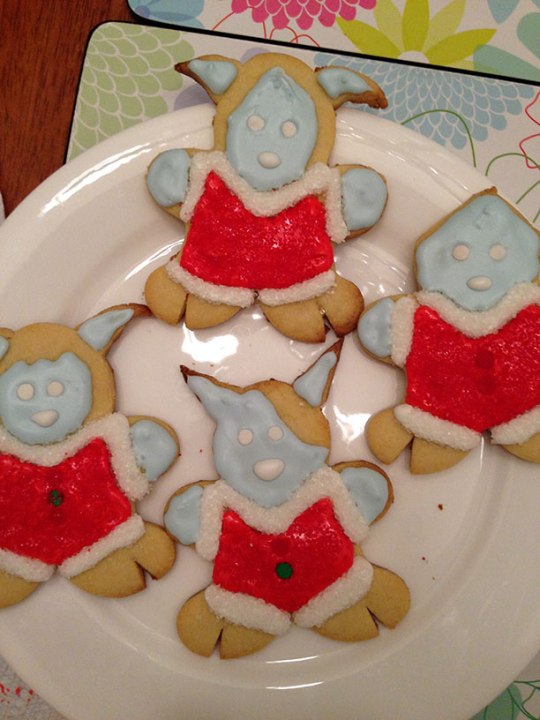
See, there’s no reason you couldn’t take this and apply it to a draenei cookie. Do a simple little smiley face, use icing to cement some M&M’s in place, and you have a cute, festive little draenei cookie. So don’t let the elaborate decorating methods intimidate you! The next part of this demo is what I would consider “advanced.” It isn’t for the faint of heart, and you should have some decorating experience if you’re going to do it. Or you’ll tear your hair out and be mad at me (please don’t). Here’s what the cookies look like when decorated with royal icing.
They aren’t perfect (I’d never used this icing before either!) and I have learned a few things I’d do differently for next time.
Decorating your cookies with Royal Icing
Royal icing is a very different beast from regular, buttercream icing. It’s runnier, and the best way to apply it is using little squeeze bottles rather than a piping bag. The advantage of it is that it gives you that puffy, smooth icing look that you can’t really get from another kind of icing. The method behind using royal icing is actually pretty simple – you first outline an area you want to be a specific colour. (Looking at my cookies above, one hand would be an area, or the faces). Then you fill the area with icing, and use a small spatula to smooth it out. At this point if you want any special effects or decoratings (like the sanding sugar on the draenei’s cuffs) you sprinkle that on. Then you let that colour dry and move on to another cookie. By the time you come back to the first cookie to add a second colour, your icing is dry and won’t run together. There are wet-on-wet ways of using the icing too but I didn’t employ any of those. If you want to see some demos in action, Sweet Dani B has some good ones on her Youtube channel. I also linked to her royal icing recipe earlier.
If you’re using royal icing, I’d recommend after you mix it up (one batch makes a lot) put it into bowls and make the colours you know you’ll need. Then, take a sandwich bag and put it over a mug. Scoop your coloured icing into the bag and then seal the bag. Snip a tiny tip of the icing bag and put the tip in an empty squeeze bottle. Slooowly squeeze to get the icing into the bottle. Then use the provided bottle tip to cover it. I had some issues with my icing by the time I was finished in terms of consistency – you can see that the grey parts on the cookies are not as smooth as they should’ve been. This is because it had dried out somewhat and I should have thinned it. Live and learn! But if you put your icing in the bottles all at the beginning, that should keep it from drying out.
The hardest part of decorating the cookies this way is planning out where areas of colour will be. Don’t be afraid to draw yourself a diagram beforehand if that helps. I’m pretty confident just winging it but you don’t have to do it that way.
I skipped a step for this photo. For the first step (to make cookies like mine) take plain white royal icing and squeeze it onto the areas you would like to be the sparkly cuffs of their outfits. Holding the cookie over a paper plate, liberally sprinkle it with white sanding sugar over the areas you iced. Shake it a little bit or brush it with your fingers to remove excess sugar. Allow to dry.
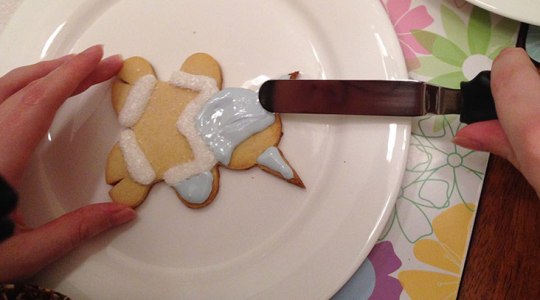
Once the white on your cookies is dry, start with the “skin” or blue! Be sure to have your candies ready if you are using them for any facial features (eyes, etc.)
Now pipe the outline of the area you want to ice. I left a chunk empty across her head because I want to put hair there.
“Fill” or flood the area you outlined. This is just a rough step, you don’t have to literally fill the entire surface area. Just enough so that when you smooth it out with your spatula, it should look nice.
Now smooth the icing. Once you’ve done this with all of your draenei, they’ll look something like this:
I waited until the blue was mostly dry before adding a bit of white to make mouths. That part was tricky, which explains why some of them look like they are making faces. At this point I could move on to their outfits, because there wasn’t any place where blue would be touching (except for the one draenei who had face tentacles, I left him for last just for that reason.
Proceed just like you did with the blue to do the inner red part. Outline, fill, and smooth. I found that getting the right red colour was really hard, so I also added red sanding sugar at this stage to make their outfits a bit redder. My mistake here was that I did it after I’d added buttons, so some of the buttons got a bit covered by sanding sugar. The neat thing though is that as long as your other colours are dry, the sugar will not stick to either white or blue areas. So you can have different sections with different effects very easily!
I stopped taking progress photos at this point because it was getting late and I was tired. But all I did was proceed to add grey/black hair to each hoof area and each head. Except the male draenei, I guess they are bald in this case because I didn’t leave room to give them hair!
Worth noting for this guy – I made his tentacles rings by just squeezing a bit of white icing in a line and then sprinkling with golden sparkles. All of the other colours were dry, of course!
So in the end, this was a worthwhile cookie experiment. I already knew I could make draenei cookies from previous years, I just wanted to make them better. If you’re going to do these, keep in mind that making them draenei does add some time. I didn’t keep track of how long I spent doing this, but the decorating was probably at least two hours.
Now I don’t know what to do with these cookies. I can’t bring myself to eat them. (This happened the first year I made them, too). You could probably adapt any of these instructions to make your favourite WoW race – cut a triangle out of the feet and then round it and you have a troll’s two toes! Change the type of horns and use brown sanding sugar and you could have a Tauren. If you make these or any type of similar WoW cookie, please let me know! I’d love to see them. Also, if you have any questions or if something is unclear, please comment to let me know and I’ll try to answer as best I can.


Comments on: "Sugar Draenei Cookies How-To" (8)
Remember your old peppermint truffles recipe? I am so going to try both that and this one this year.
Those look amazing!
So so cute. Love the female with the bangs in her face, reminds me of my spacegoat 🙂
I am all over this. Will I post pix of my success? Probably not. Won’t have time to take pictures! Thank you so much for sharing this!
http://wowsugar.blogspot.com/2013/12/third-blog-versary-applause-chicken.html
I’m sorry, a little bit offtopic, but on topic of Mages: great news about our DoTs https://twitter.com/Celestalon/status/411959846640967681
[…] holiday season, it’s time to get cooking! We recommend kicking off this holiday season with this how-to from Manalicious that walks you through making your own draenei-shaped sugar cookies. We think the results, above, […]
Cutest sugar cookies…Ever!! Love them!
By far the best looking cookies ever! I know they are delicious also. Thank you for sharing